- Messages
- 2,051
- Likes
- 1,411
- City
- Grand Rapids
- State
- MI
- Country
- United States
- What I Drive
- 2018 Ford Fiesta SE HB
I'm re-threading this set of posts over here so the amalgamated - Welcome Thread can hold it's own...
Anyways...
Found a easy way to the Sensor - but - well, I'll let you folks decide this and which route to take.
Firstly, the Ambient Air Temp sensor I have ( or had) was installed wrong - at least when I discovered it...
The Vehicle is new (to me and SOS) so to have this happen and how the Dealers' non-resolution resolve - comes into this a separate beast for it's own, which is beyond my response to post this...
So what you're seeing is my rework...
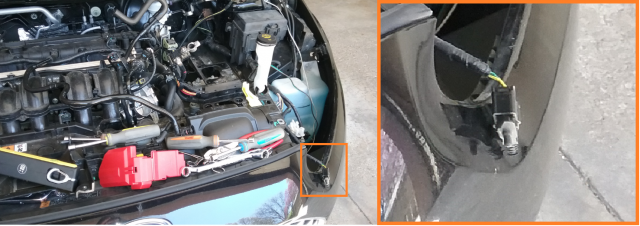
The Ambient Air Temp sensor is on the Front Skirt by the Snorkel for the Air Box.
I was helping in the thread and since this kinda' reopened an old wound, I figured I'd better do up a post or two as a Salve to ease the effort for the next guy...
So - let's cut to the Chase...
That's it!
a roughly $7 sensor
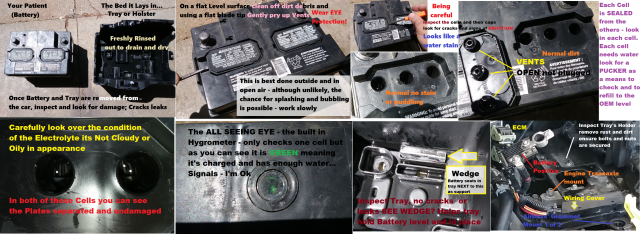
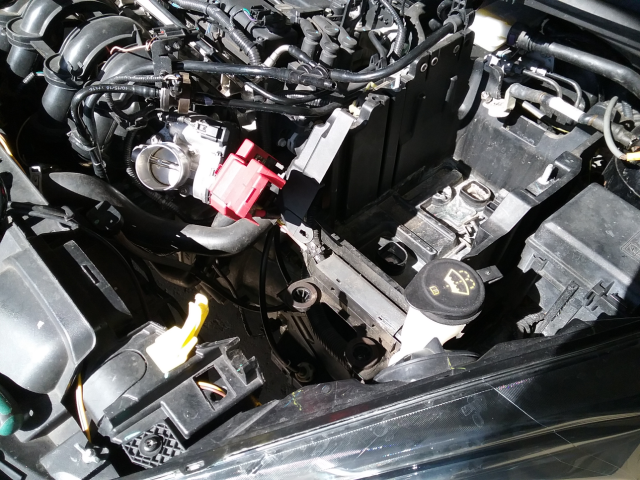
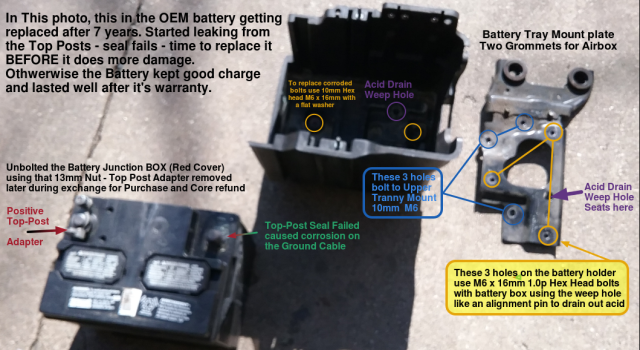
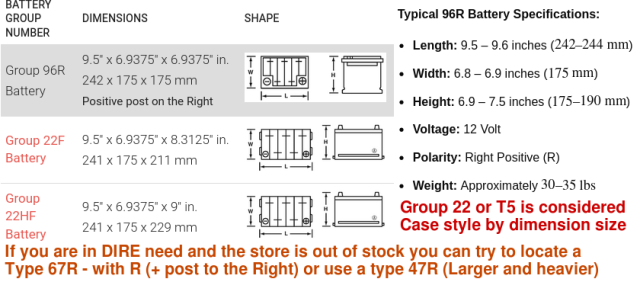
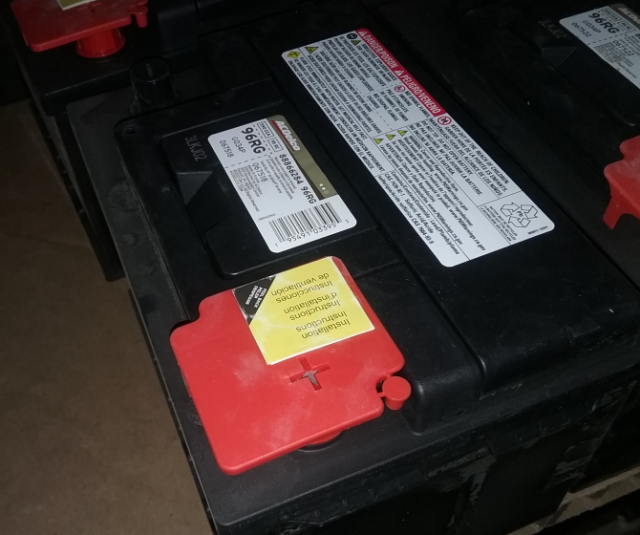
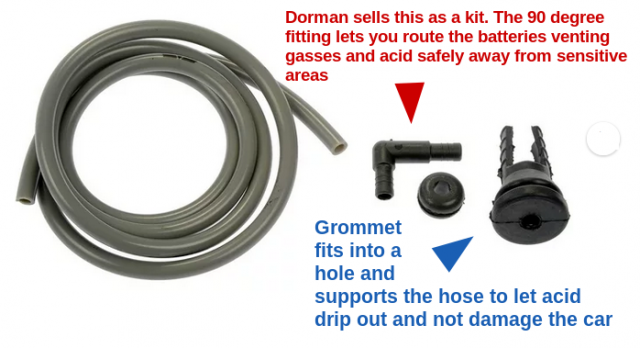
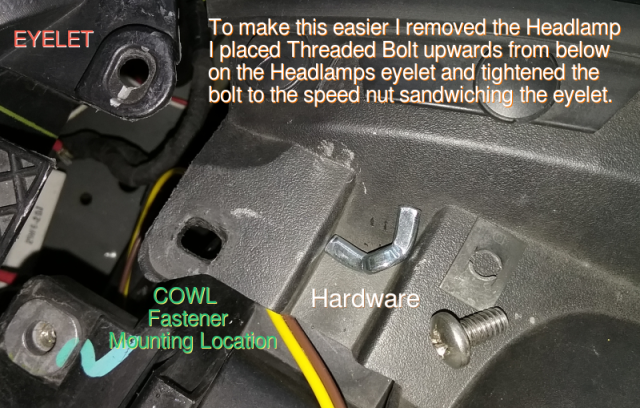
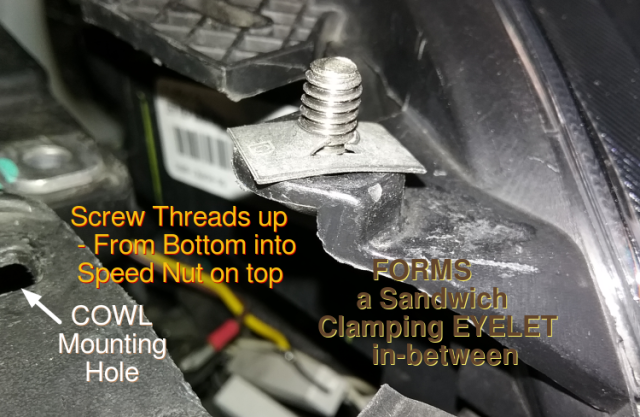
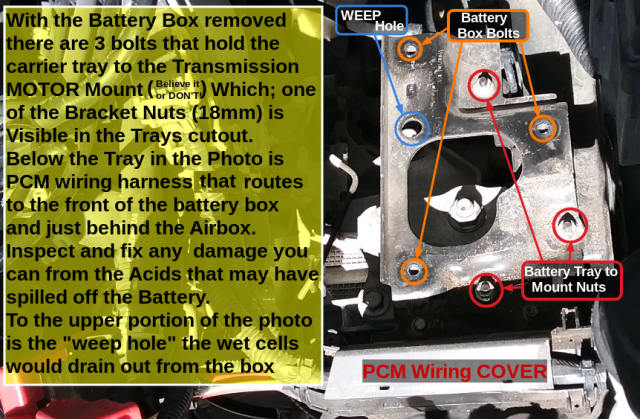
I took apart the Battery tray and cleaned out the road salt and inspected the tray, holster and made sure all wiring was still in good condition, which requires removal of the Air Box, Snorkel, Air Intake hose, and Left Front Headlamp.
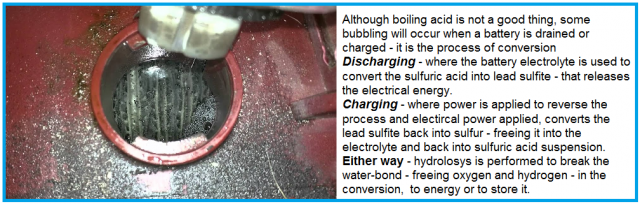
This is so you have clearance to gain access and remove the Battery tray and Battery - check and clean neutralize the acids and inspect, check level and top-off the OEM Battery water - just for a measure of prevention.
The OEM Battery is a Maintenance Free type - take that in whatever way you wish, but it's simply a Battery with plates in a Deep-Well flood design so thru it's normal life cycle, it shouldn't go dry. I said Normal - but what is normal?
,Any Battery maintained well and kept clean and topped off, DOES last longer and in this day and age, it makes more sense to keep what you have working than to take chances on ignorance and lack of car care, being your guide.
Back to the task...
This got left dangling and made an annoying Rattle because of the original way it was mounted was
INSIDE the Grille exposed to all the salt debris and Grime so what you see above is the "wash me" moment
If you look below the probe, you'll see the two "Gator" clips - one got truncated,
Caused that when I tried to originally remove the sensor that was inside the Grille.
This view is the Sensor resting on the cutout of the Left front Headlamp I removed..
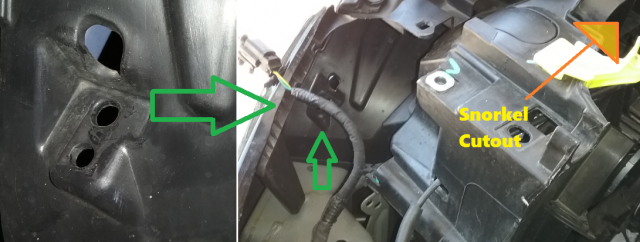
In this view,
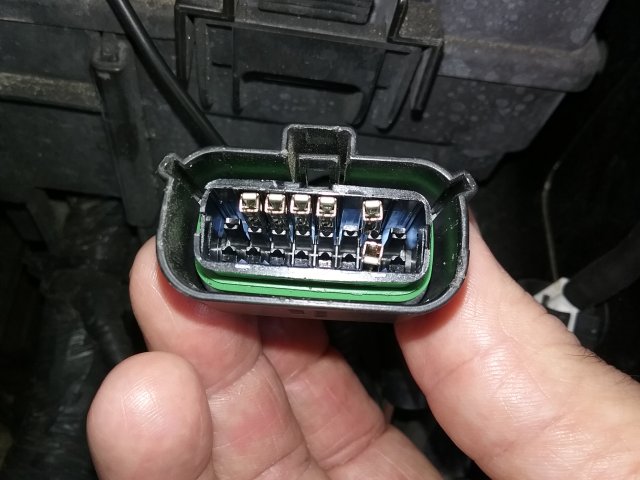
The mounting location is at the Grille, you're seeing looking down inside Front Left Headlamp opening
Showing the position of where the Ambient Air temp sensor goes...
Air Box and Headlamp is removed - Snorkel Cutout to Air Box at Upper Right by Radiator shroud.
You can readily see that you can swap out the Sensor easily
just have to take parts off to get the room to obtain access to the Sensor.
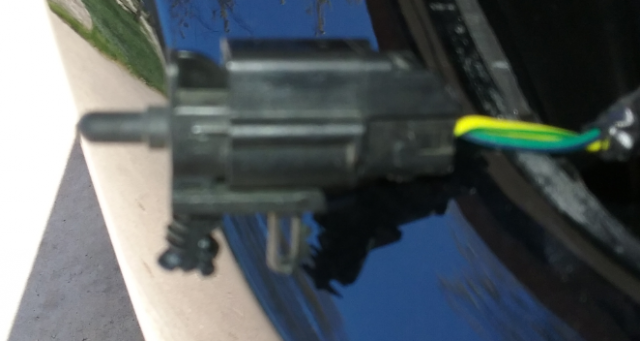
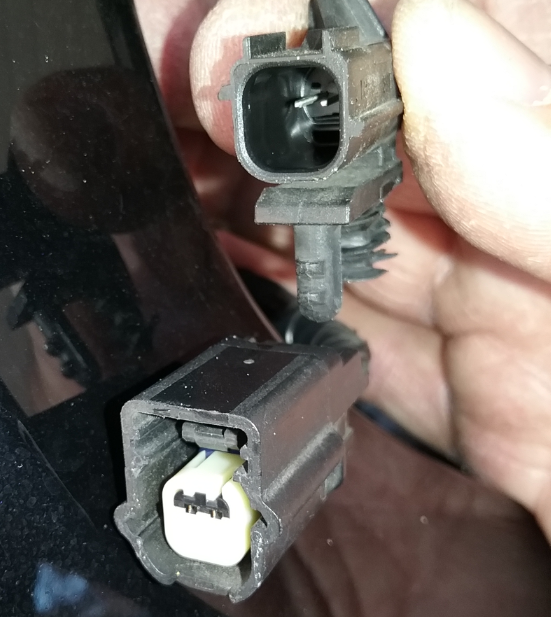
The Sensor
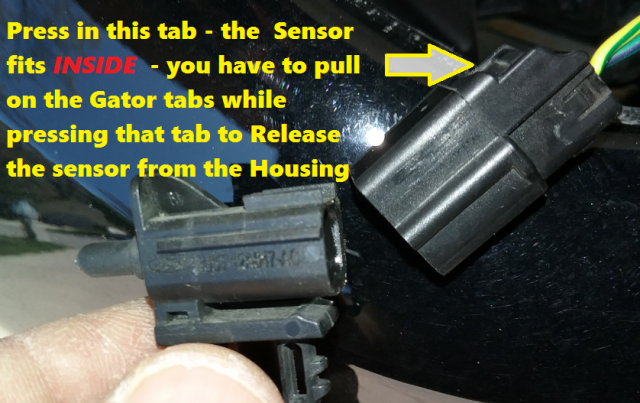
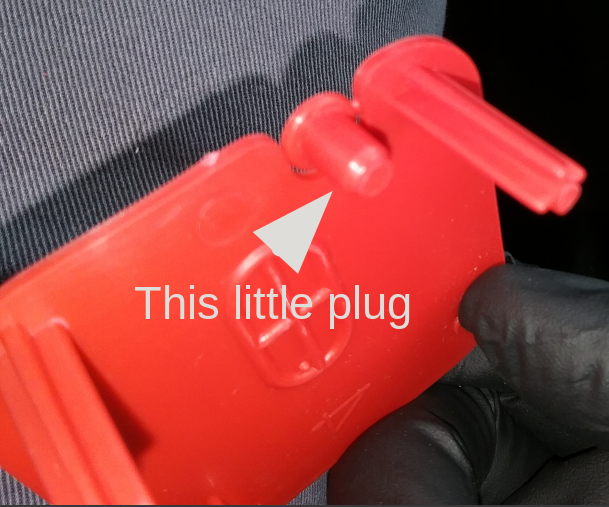
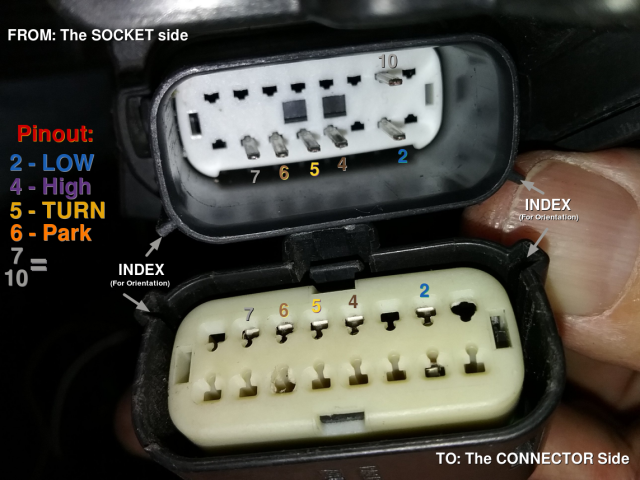
To protect the Sensor, the Electrical Connector is LARGER of the two,
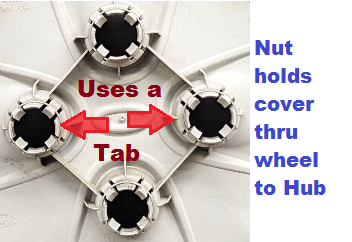
You press the Tab and the Electrical Connecter as it is the outer SLEEVE that holds the sensor
pull it apart holding the Gator Tabs and TAB of the connector (don't pull the Nose - it's has the Electronics and it could get Damaged)
Those Gator tabs of the Sensor is what holds the whole mess in the Grille,
The Electrical Connector acts as a protective sleeve, the Nose sticks out into the Airstream for the temperature
The Electrical Connector holds this to the harness .
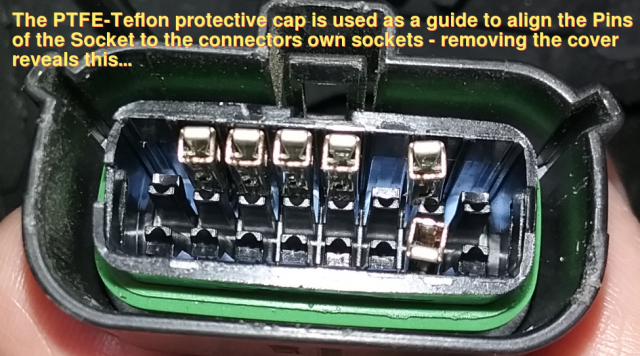
Another view to help you see the sensors simplicity and how the connector
protects the Sensor and acts as the load bearing weight to the harness
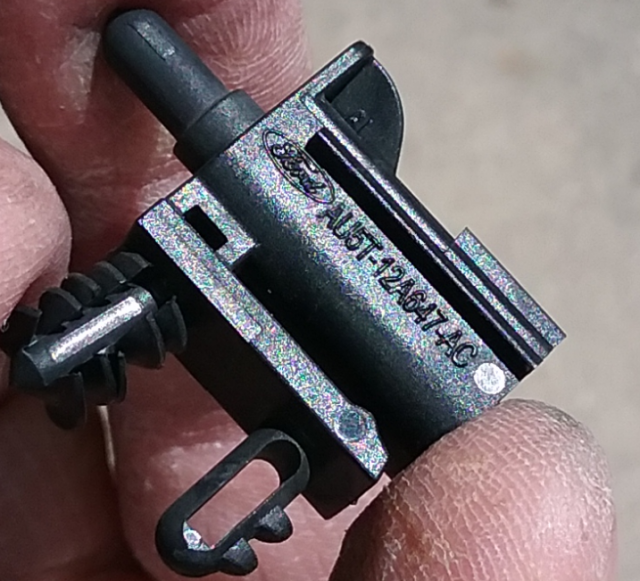
It's got a similar number per the Threads earlier postings, but this is the
NEW Part Number!
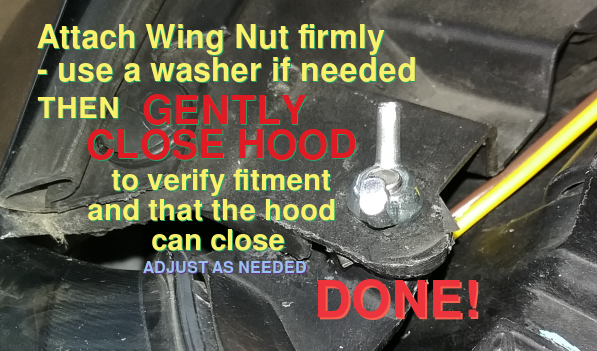
Once it's put back together - it looks like this correctly mounted...
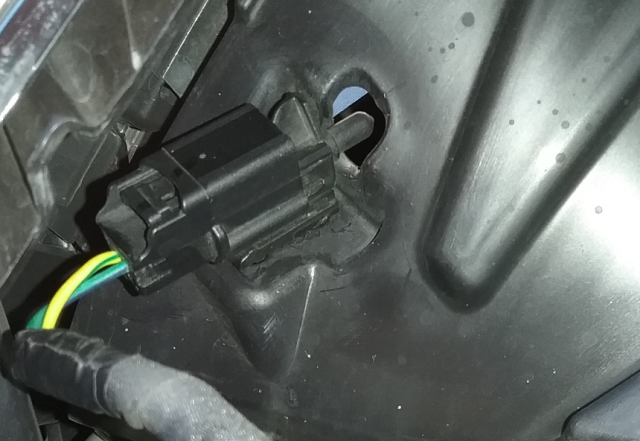
Reassembly required...
Put you and your car back together as you see fit...
Many thanks to @scotman for his help on this.
https://www.fordfiesta.org/threads/welcome-newcomers-please-introduce-yourself.850/post-16419
Anyways...
Found a easy way to the Sensor - but - well, I'll let you folks decide this and which route to take.
Firstly, the Ambient Air Temp sensor I have ( or had) was installed wrong - at least when I discovered it...
The Vehicle is new (to me and SOS) so to have this happen and how the Dealers' non-resolution resolve - comes into this a separate beast for it's own, which is beyond my response to post this...
So what you're seeing is my rework...
The Ambient Air Temp sensor is on the Front Skirt by the Snorkel for the Air Box.
I was helping in the thread and since this kinda' reopened an old wound, I figured I'd better do up a post or two as a Salve to ease the effort for the next guy...
So - let's cut to the Chase...
That's it!
a roughly $7 sensor
I took apart the Battery tray and cleaned out the road salt and inspected the tray, holster and made sure all wiring was still in good condition, which requires removal of the Air Box, Snorkel, Air Intake hose, and Left Front Headlamp.
This is so you have clearance to gain access and remove the Battery tray and Battery - check and clean neutralize the acids and inspect, check level and top-off the OEM Battery water - just for a measure of prevention.
The OEM Battery is a Maintenance Free type - take that in whatever way you wish, but it's simply a Battery with plates in a Deep-Well flood design so thru it's normal life cycle, it shouldn't go dry. I said Normal - but what is normal?
,Any Battery maintained well and kept clean and topped off, DOES last longer and in this day and age, it makes more sense to keep what you have working than to take chances on ignorance and lack of car care, being your guide.
Back to the task...
This got left dangling and made an annoying Rattle because of the original way it was mounted was
INSIDE the Grille exposed to all the salt debris and Grime so what you see above is the "wash me" moment
If you look below the probe, you'll see the two "Gator" clips - one got truncated,
Caused that when I tried to originally remove the sensor that was inside the Grille.
This view is the Sensor resting on the cutout of the Left front Headlamp I removed..
In this view,
The mounting location is at the Grille, you're seeing looking down inside Front Left Headlamp opening
Showing the position of where the Ambient Air temp sensor goes...
Air Box and Headlamp is removed - Snorkel Cutout to Air Box at Upper Right by Radiator shroud.
You can readily see that you can swap out the Sensor easily
just have to take parts off to get the room to obtain access to the Sensor.
The Sensor
To protect the Sensor, the Electrical Connector is LARGER of the two,
You press the Tab and the Electrical Connecter as it is the outer SLEEVE that holds the sensor
pull it apart holding the Gator Tabs and TAB of the connector (don't pull the Nose - it's has the Electronics and it could get Damaged)
Those Gator tabs of the Sensor is what holds the whole mess in the Grille,
The Electrical Connector acts as a protective sleeve, the Nose sticks out into the Airstream for the temperature
The Electrical Connector holds this to the harness .
Another view to help you see the sensors simplicity and how the connector
protects the Sensor and acts as the load bearing weight to the harness
It's got a similar number per the Threads earlier postings, but this is the
NEW Part Number!
Once it's put back together - it looks like this correctly mounted...
Reassembly required...
Put you and your car back together as you see fit...
https://www.fordfiesta.org/threads/welcome-newcomers-please-introduce-yourself.850/post-16419
Last edited: