• Sign Up! To view all forums and unlock additional cool features

    Welcome to the #1 Ford Fiesta Forum and Ford Fiesta community dedicated to Ford Fiesta owners and enthusiasts. Register for an account, it's free and it's easy, so don't hesitate to join the Ford Fiesta Forum today!


Ford Fiesta Ecoboost 2014 Rear Lights Flickering

Nutpea75

New Member
Messages
1
Likes
0
City
BASINGSTOKE
State
Non-US
Country
United Kingdom
What I Drive
Ford Fiesta Ecoboost 2014
#1
Hello All,

I have an issue with the rear brakes flickering, I guess it's a bad earth issue?

Can anyone tell me where I can find the earth for the lights and how to fix please?

Thank you
 

LionsTooth

Well-Liked Member
Premium Account
Messages
735
Likes
955
City
Northern
State
CA
Country
United States
What I Drive
2015 Fiesta SE HB Magnetic
#2
Are all three flickering (L, R, & Middle) or just one?

If it's just one:
  • Use the diagrams below to find the ground for each light; and pull the bulb to see if the connection is bad
If it's all three:
  • Go to the switch behind the brake pedal and check those two wires are connected properly or if the switch is going bad.
  • Pull the fuse to be sure the connections are clean.
This is for a 2016, but should be pretty close; looms are expensive so they stay the same over time.

1604334901516.png 1604334965771.png 1604335155434.png
 

Attachments

Handy Andy

Well-Liked Member
Premium Account
Messages
1,456
Likes
1,140
City
Grand Rapids
State
MI
Country
United States
What I Drive
2018 Ford Fiesta SE HB
#3
Well, can you determine if the "Earth" aka Ground - wire - is that bad, or are you having problems with the connector?

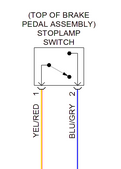
In a Fiesta - the Brake Light switch is on a bracket - and next to it, is also a secondary switch used for the PCM / Body Control Module - just in front of the brake and just behind the kickpanel.

The Brake light switch is the Dark colored one, while the PCM/BCM one is bright blue body. Turn them 1/4 turn counter clockwise to remove - it will pop out thru the lock hole (it's keyed to fit one way) to install you reverse the process, just insert plunger thru the hole then gently center the "Tangs" to allow the switch body shaft to start to seat, then pull switch body towards the plunger hole - makes the spring the holds that tang in place, move so you can then twist clockwise - to let the notches line up and lock the switch into position.

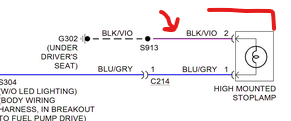
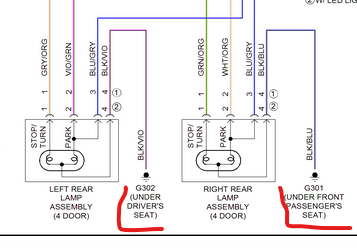
So if the connectors are seated - then you'll have to remove the seat to floor bolts and try to lift up the carpet - removing floor pan to carpet the trim panels to do this - what you will find below it, right by and just under (that long brace bar-rise the seat bolts to) is a big lug on a bolt with a lot of wires tied - soldered to it from the harness - there are two of these - one under the Driver side seat, and the passenger side seat.

This is where it gets ugly - you will have either commit to a shop, or try to fix this - but either way - this is how you inspect the ground bonding harness


Top